|
|||||||||||
Computer aided sperm analysis systems based on software, microscope and digital camera have certain advantages against automated "boxed" sperm analyzers (where all the optics and camera are put into one box):
|
|||||||||||
| However, to build a computer assisted sperm analysis system, you need to consider certain hardware requirements. Herewith we will explain all the requirements, and what are the reasons behind them for you to understand the logic of selection of your hardware components for CASA system. | |||||||||||
| Microscope for Sperm Analysis | |||||||||||
| Trinocular transmitted light microscope is required. Trinocular microscope is a microscope, in which head there is a separate port for attaching a digital camera. This is required for convenient work with both binoculars and digital camera. Of course, the camera can be installed on an eyepiece adapter, but this will not allow you to use your binocular in a normal way, and will render your work very inconvenient. | |||||||||||
|
10x objective for motility We recommend 10x lens to be used for sperm concentration and motility analysis with MMC Sperm software. Why not your usual 20x? Because 10x objective provides more focus depth that 20x. Even when you use special counting chambers or slides with 10 micron depth, which should distribute sperms in one layer to get them all in focus simultaneously, some sperms can dive out of focus, and will not be detected by the software. 20x objective has less focus depth and hence intensifies this effect even more. Therefore, we recommend using 10x lens instead of 20x. 1х C-Mount adapter The previous requirement (using 10x) is the reason for the next one: you should use 1x C-Mount adapter to install digital camera on your microscope instead of usual diminishing adapter tht provides more field of view. In case of sperm motility analysis, the field of view on 10x objective will be large. If you use diminishing adapter, sperms will appear too small, which is not convenient, and furthermore, the resolution of every object (the number of pixels per sperm head) will be not enough for precise detection. Always use 1x adapter. If you want to increase field of view on all other analysis routines (vitality, DNA, and especially morphology on 100x), buy a camera with larger sensor diagonal and use ROI (region of interest) in motility analysis if the field of view appears too large. |
|||||||||||
| Microscope Contrast Techniques for Sperm Motility Analysis | |||||||||||
| MMC Sperm software can be adjusted for different contrast techniques available on your microscope. The software can detect dark objects on light background (bright field) as well as light objects on dark background (negative or positive phase contrast). Let’s consider advantages and disadvantages of every microscope contrasting method. | |||||||||||
|
Bright field To analyze sperm motility in bright field, you need to get the microscope slightly out of focus so that sperm heads appear as uniform dark objects on light background. However, when working in bright field, you will notice that the software might detect some extraneous objects having roughly the same shape and size as sperms, and classify them as spermatozoa. This leads to increase of detected sperm concentration of immotile sperms. When using phase contrast, this effect is significantly lessened, therefore, we recommend using phase contrast instead of bright field. |
|||||||||||
|
|||||||||||
|
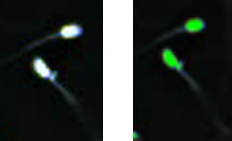
Positive phase contrast Positive phase contrast depicts spermatozoa as dark objects bearing a light spot in the center of the head on grey background. This contrasting technique allows you to cut off most of the extraneous objects, but since the light does not cover the head completely, the parameter describing sperm head shape is not working well enough, which leads to less recognition accuracy: the sperms will not be differentiated from debris well enough. Furthermore, positive phase contrast has a side effect: some kind of light halo is generated around sperm heads. These halos can also interfere with sperm detection. |
|||||||||||
|
|||||||||||
|
Negative phase contrast When using negative phase contrast, sperms appear as light objects on high contrasted dark background. The light covers sperm heads exactly preserving the shape. Most extraneous objects are covered by dark background and don’t interfere with sperm detection. Negative phase contras it the best contrasting technique for sperm motility analysis. |
|||||||||||
|
|||||||||||
| Other sperm analysis modes are not so demanding in terms of microscope requirements. 40x bright field objective is used for sperm vitality and DNA fragmentation analysis. 100x oil immersion objective is required for sperm morphology analysis on specimens stained with Diff-Quik. | |||||||||||
The following microscopes can be recommended for sperm motility analysis:
|
|||||||||||
|
|||||||||||
|
|
|||||||||||
|
Microscope beam splitter Beam splitter is used to drive the light to digital camera instead of binocular. It is required that maximum light goes to the digital camera so that the camera sensor is able to provide 60 fps at minimum exposure time while analyzing sperm motility under 10x objective, and make high quality images with minimum digital gain in other sperm analysis techniques. Therefore we highly recommend 100/0 beam splitter (a switch that directs all the light to camera or to eyepieces). If your microscope manufacturer does not provide such version of beam splitter, consider using 50/50 splitter and maximum power light source. Beam splitter 80/20 (80% of light goes to binocular eyepieces) is not recommended. |
|||||||||||
|
Microscope light source LED light source with maximum available power is recommended. This is a reliable, long-life light source. If only halogen lamps are available, make sure the power of the lam is at least 30 W, the more the better. Consider that cheap microscopes can be equipped with badly stabilized halogen lamp power units, which can lead to flickering effect that will be registered by the camera at frame rates higher than 50 fps. This will make sperm motility analysis at required 60 fps impossible. Therefore LED light source is highly recommended. |
|||||||||||
|
Microscope Setup When a microscope is being used as a part of image analysis system, microscope setup becomes crucially important since any image analysis software is actually analyzing the provided image and not the specimen itself. Therefore, any flaws in microscope configuration can lead to wrong results. A computer aided sperm analysis system is no exception to this. Don't forget that the target of all setup procedures is a quality image on digital camera sensor. For this reason, all the steps of microscope setup should be performed with digital camera on and looking at the PC monitor instead of microscope binocular. Kohler Illumination (Köhler Illumination, Koeler Illumination)
|
|||||||||||
|
|
|||||||||||
| Digital Camera for Sperm Analysis | |||||||||||
| Sperm motility analysis routine defines the requirements to digital cameras that should be used as part of computer assisted sperm analysis system MMC Sperm. For precise detection and tracking of spermatozoa the camera should be able to record video clips with frame rate of 60 fps at minimal resolution of 1.3 megapixel. At the same time, the camera should also provide high quality color images for other analysis routines. 60 fps at 1.3 Mp resolution, this is quite a big data flow. Recording video at such resolution and frame rate is only possible directly to PC operational memory. Camera setting for motility analysis are very much different from those for other routines: 60 fps at minimum exposure for motility, color is not important, and high quality color images with minimum digital gain and noise regardless framerate for other methods. For these reasons, we recommend only cameras with our direct drivers, which enable recording video directly to PC memory as well as saving and loading separate presets with all camera setting for every analysis routine (currently, motility, vitality, morphology, DNA fragmentation, should any new methods be added, all settings must be saved and loaded for them too). Ask for recommended cameras. | |||||||||||
| PC Requirements for Sperm Analysis | |||||||||||
| PC requirements are also mostly defined by sperm motility analysis. Processor and chipset should be fast enough to facilitate video recording to PC memory at 60 fps without losses, and fast processing of these video clips. Only motherboards based on Intel chipsets can be used for that purpose, preferably those with Z mark (e.g., Z270 or higher). Intel processors starting with i5, preferably, i7. Celeron and i3 processors usually are not fast enough for comfortable and fast workflow: frames are lost while recording, video processing becomes too slow. Minimum of 8Gb DDR4 operating memory is recommended. Windows 10, 64 bit operating system should be installed on your PC. SSD instead of HDD for installation of the OS and our software is preferable. | |||||||||||
| Back to top | |||||||||||
| Request demo version | |||||||||||
| © 2019 MMCSoft. All rights reserved. | ||||||